


 Reply With Quote
Hi,
Nice write up and pics. +rep as it's always good to get some tech info.
seeyuzz
river


Hi guys,
A few of you may remember I posted up a few questions re: valve grinding a week or so ago.
Since there was little on here (or around the place) I have taken some pictures carefully and put together some explanation of the process I undertook.
I am not a professional mechanic.
Tools:
1. Valve Suction Cup/Grinding Tool
2. Valve Grinding Paste (Grade 1 and 2)
3. Bearing Blue
4. Rags
5. Engine Assembly Grease
Process:
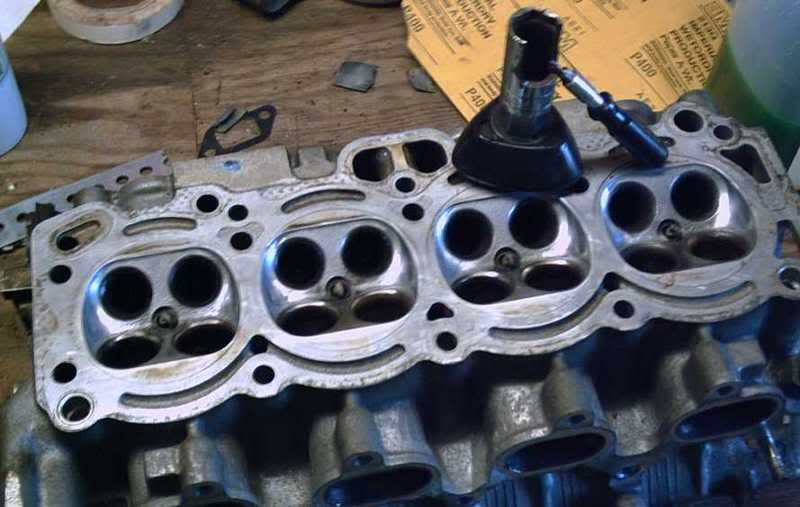
As you can see my valves seats were a little tired. I've taken some pictures of what your seats might look like at 180,000ks
So I've applied some engine oil to the valve stem (head and valves have been cleaned: head -> paint thinners and kero etc with a brush to remove all carbon build up -- valves and stems in wire brush bit on grinder) and some Grade 2 (coarse) grinding paste to the seat face area of the valve and inserted it
Grinding is a process where I rotated the tool between the palms of my hands lifting and rotating 90 degrees or so every few times or so to ensure that no grooves were being worn in my seats. Make sure the tool and the valve face is clean so the tool sticks well.
Above is what my seat looked like after the treatment with the coarse grit. In a few instances I had to do 2 or even 3 courses of this till it was a nice even surface with no pits evident. If I was unsure at this stage I could clean out the seat and valve and paint some Bearing Blue onto the valve and run it around to see if I'd missed any spots.
Above are picture of the valve seat after a course of the fine grinding paste. Every time after I'd done this course I'd apply Bearing Blue to the valve and run it around to make sure the seat was smooth.
I've got a picture above of a finished product (right) and a yet to be done seat on the left. I've tried to light them as good as possible to higlight the pits on the worn seat.
Above is a picture of a seat with some Bearing Blue having been run around showcasing/highlighting the pits etc.
Please bear in mind this is a powerful macro setting so these are tens of a thousandth these pits on the seat etc and most of them came out with just one round of the coarse grit.
Another note, I hadn't used Bearing Blue before (you can get it from Repco, Super Cheap don't have it) and the best technique is literally just to have a thin thin smear painted onto the valve as if there's any 'depth' to it, it will fill in the grooves/holes and you won't see the pits so easily.
Question. I haven't really cleaned the seat after I've completed the process besides a very thorough wipe out/clean with a clean rag. Then the Blue goes on and I leave it ready to go (oh and a moly base assemb. lube on the stem).
Should I be washing the seats/valves to remove even the smallest trace of the paste. I think I'm fine but just a quicky..
...thanks gotta run to the movies!
Rob
Past: 1988 ST162 - RIP *cry* 1990 ST185 - not rob's anymore , '92 LS400, '02 Yamaha R6
Present: 1991 ST185 Group-A #148 - Gen III 3SGTE - 163atwkw - 13.4'' 1/4 Mile , 1981 BJ42
Rob | Constance | Just Stop & Think
Hi,
Nice write up and pics. +rep as it's always good to get some tech info.
seeyuzz
river
The thinking man's clown and the drinking woman's sex symbol
RA25GT - There is no substitute | 18R-G - Toyota's Dependable Masterpiece
Toymods Car Club Treasurer, assistant Historic Plate Registrar & Forums Admin
Yeah thats spot on write up there,
Although its not completely necessary to use the bearing blue if you dont want to. Washing them after to remove any traces is not needed, if you have already throughly wiped the surface with a clean rag.
Excellent detailed pics
Nice writeup and photo's.
Just a few suggestions that may help out a bit. (without trying to be an ass)
When you blue the seats you shouldnt spin the valve. You should just apply the thin film of blue to valve and then firmly and quickly press the valve onto its seat without turning the valve, then remove and check its mark. This is the best way to acheive your mark with the bearing blue. Spinning the valve only "masks" any potential errors in the surfaces. Not sure if this is how you did it not, but its worth a mention
Its always a good idea to wash the seats and ports after lapping. Often grinding paste can be excessive and droplets can fall down a port or valve guide. As we all know, the paste is abbrasive and should not be let enter a runing engine. To be %100 sure its all gone the only way is to give it a good wash. Anothing thing to note is that most lapping pastes are water based, and will not easily be removed with petroleum based cleaners or solvents. The paste will dry and form a sticky compound (like pva glue) and will need some iritation to be removed. Generally high pressure water is best for cleaning up the dried lapping paste but if you havent got access to high pressure washers, some warm soapy water, a 1 inch wide paint brush and some compressed air is the go! Be sure to blow of and dry up any moisture.
If your head is going to be sitting for a while, ensure all seat surfaces are totally free from moisture and bearing blue so that rust does not form between the valve seat and valve while in storage. Applying the moly lube will assist prevent this but often can just trap the moisture between the seats aswell.
I hope this helps
Kind Regards
Jeff
I did see a guy use a drill to spin the valves once.
He put the paste on and inserted the valve then attached a drill to where the collets go and spun them that way.
Was a dodgy rebuild on that motor.
My sig has been pruned as it was over 5 lines long.

these are my favorite tech articles, becuase it shows that anyone can do something that we previously thought was complicated.Originally Posted by RobST162
thanks + rep
MX83 2JZ-GTE!!
#YOLO.
Good writeup and good info from Jeffro.
Might also be a good idea to expand this and include how to remove/reinstall valves, springs, collets, buckets, cams, and also measure tolerance etc.
Daily Driver: Red Ae93 Project: My TA22 - now with 3s-gteD is for Disco, E is for Dancing
thanks for all the additional info - that's what I was really hoping for here to see anyone who follows our footsteps will have a good idea of what to do and how to go about it
and for the rep and good comments
in regards to removing cams - well that's pretty straight forward but as for springs/retainers etc etc.. I cannot recommend enough the toyotool below
http://www.toyotool.com/valvemaster_instructions.htm
worth every cent and then some
once the cams are out (assuming the head is off the car) I can change all the seals in a matter of minutes, like less than 5
Past: 1988 ST162 - RIP *cry* 1990 ST185 - not rob's anymore , '92 LS400, '02 Yamaha R6
Present: 1991 ST185 Group-A #148 - Gen III 3SGTE - 163atwkw - 13.4'' 1/4 Mile , 1981 BJ42
Rob | Constance | Just Stop & Think
ps, I didn't bother with all the extraneous stuff.. just the tool from that guy
Past: 1988 ST162 - RIP *cry* 1990 ST185 - not rob's anymore , '92 LS400, '02 Yamaha R6
Present: 1991 ST185 Group-A #148 - Gen III 3SGTE - 163atwkw - 13.4'' 1/4 Mile , 1981 BJ42
Rob | Constance | Just Stop & Think
well if you're super amazingly strong like me it's pretty easy
hehe nah toyotool dude has a youtube vid with him doing it
it's not to hard, just a strong quick push and it all happens mate
Past: 1988 ST162 - RIP *cry* 1990 ST185 - not rob's anymore , '92 LS400, '02 Yamaha R6
Present: 1991 ST185 Group-A #148 - Gen III 3SGTE - 163atwkw - 13.4'' 1/4 Mile , 1981 BJ42
Rob | Constance | Just Stop & Think
good size tube socket and hammer. Place rag over socket so collets are caught when you hit the socket. Easy
Hi
Have you pressure tested the lapped valves (any leakage), what did you use & where can you buy it?
I've used a sectioned 13/16 spark plug socket for years.....
works quite well on 4AGs
I use a palm ratchet for most... and if I get a stubborn one, I use a 6" ext, a small piece of towel, and a 12 oz deadblow hammer to "persuade" the keepers from their seats
Information is POWER... learn the facts!!
but once you've seen the toyo tool in action there's no going back
http://www.youtube.com/watch?v=ZFTae...layer_embedded
Past: 1988 ST162 - RIP *cry* 1990 ST185 - not rob's anymore , '92 LS400, '02 Yamaha R6
Present: 1991 ST185 Group-A #148 - Gen III 3SGTE - 163atwkw - 13.4'' 1/4 Mile , 1981 BJ42
Rob | Constance | Just Stop & Think
 Posting Permissions

Bookmarks