
 Reply With Quote
look on ae86drivingclub.com.au


Hey All,
Currently in the process or sourcing an altezza half cut to squeeze into my sprinter.
Ive spent hours loooking for info on this conversion as i have been told there is alot of custom fab work to be done, but to this date i cant find any photos or description of exactly what needs to be modified to fit.
Im also chasing drawings or plans so i can copy what other guys have done in this conversion so i can get it all set up before the half cut arrives.
Any and all help would be great.
Cheers
David
look on ae86drivingclub.com.au
That was the first place i checked.
cant get onto any of the guys.
thats why i came here
you need to fabricate engine and gearbox mounts,
you need to sort something out with the plenum as it touches the clutch master,
and you may need to do some firewall and tunnel massaging.
Few other things too probably,speak to anthony at kaizen garage

There's a lot of info on ae86dc, you just have to dig a bit and sift a bit. There was also a good, brief writeup on the old Toymods years ago. From memory someone had written "how to RWD a 3S in 1000 words or less", which listed the main problems encountered and how they can be overcome.
...
...
Well, what do you know, I found it here on an archive CD. Unfotunately I don't know who to credit it to other than "Trevor".
And another random copy-pasteMy conversion putting a 3SGTE into a TA22 Celica
Motor 3SGTE out of ST165 Celica
Gearbox W57
Bellhousing 2S from SA 63 Celica
Sump 2S
Oil Pickup 2S
Flywheel 2S
Clutch/presure plate 2S
Starter 2S
Alternator bracket 2S
Engine Mounts 2S/2T
Turbo ST165 Group A
Exhaust Manifold Custom
Inlet Menifold Custom
Computer Haltech E6S
Diff Hilux LSD
Intercooler ST185 Celica ( Air to Air )
Coils Direct Fire from 4AGZE
Cam Covers ST162 3SGE
Radiator TA22
Fuel Pump VL Turbo
Tail Shaft Custom
Fan Thermo
Exhaust 2 1/2" mandral
1/ Flywheel
The 3SGTE flywheel sits closer to the block than the rear wheel drive 2S which means the input shaft does not sit into the sprigot bearing , the throughout bearing near hangs off the guide tube and the clutch plate does not slide onto the input shaft spline far enough , also the ringgear has a larger diameter than the 2S so the starter would need to be moved outwards about 5mm .
The 2S flywheel has a 6 bolt pattern and the 3SGTE has a 8 bolt pattern , so what I did was redrilled the 2S flywheel to 8 bolt , to do this I tapped 4 of the holes with a 1/2 unf thread and pluged these with 1/2 unf allthread , 2 of the holes in the 2S flywheel already line up and another 2 can be clean drilled but the other 4 holes come half and half so pluging these made it posible to redrill .
I have been told the 3SGTE clutch , presure plate & flywheel can be used by getting about 5mm machined off the face of the bellhousing ( this 5mm machining does not fix the starter problem as the starter needs to be moved outwards from the crank ).
2/ Intake Manifold
The intake manifold sits to high and will not alow the bonnet to close , I cut the manifold about 90mm from the face and welded on a new plenum made out of 3" thick wall aluminium tube and fitted the throttle body at the front aiming down a little , I cut a hole between the radiator and headlight for the intercooler plumbing to connect to the throttle body .
3/ Exhaust Manifold
The original manifold cannot be used as the starter is in the way of the turbo and the turbo would also be sitting back to front .
I made a manifold out of 1 1/4" steam pipe and bends . I made the dump out of 15mm plate and 3" mandrel pipe , this 3" dump extends down to just under the car an than reduces to 2 1/2 mandrel for the rest of the exhaust system with a 3" straight through stainless muffler behind the diff .
I faced the compressor outlet down towards the bottom and made the plumbing to exit through the bottom of the radiator support panel where I had cut a hole and connect to the ST185 intercooler .
4/ Engine Mounts
The 2S mounts bolt onto the left side of the block but on the right side there is only two holes in the block so I bolted the mount onto these two holes and welded some brackets onto the rear side of the mount which extended towards the back of the block where there is another two holes . I drilled out the spot welds on the mounting plates on the crossmember so these mounting plates can be moved , I bolted the rubber mounts to the mounting plates then modified the 2S mounts as for the TA22 rubber mounts would bolt onto them , now with the mounts bolted up I positioned the motor to where it had to sit then rewelded the mounting plates back onto the crossmember , The correct position for the motor is about 85 to 90mm measured from the rear of the head to the firewall and with about 20mm clearance from the sump to the crossmember .
5/ Alternator
I used the alternator bracket off the 2S which sits on the r/h side under the intake , the 2S alt mount will need a bit grinded off the bottom to bolt on .
6/ Cooling system
I used the TA22 radiator but had to move the top spout to the left side then used a long hose to go to the rear of the motor where I had made a rear water outlet out of 1 1/4 " steam bends and pipe , this outlet consists of a 90 degree facing out to the left then 90 upwards and then another 90 to face the outlet forward at a hight to run the hose along the side of the cam cover , I brassed a couple of fittings into this outlet and fitted the temp gauge sender and the water temp sensor , I searched around and found a couple of hoses and a stainless joiner to make the bottom hose . Then fitted a thermo fan to the radiator .
7/ Ignition System
The original distributor can be used by just removing the cap and rotor button then cutting the rotor button shaft off level with the pickup rotor and making a short cover to fit back on , this will give enough clearance to the firewall , the cover must be made of a non magnetic material such as aluminium or plastic as not to upset the magnetic pickups . the distributor can now be used and configured with an aftermarket ECU to run direct fire system , I used two direct fire coils from a 4AGZE and two toyota igniters , I bolted a length of 1' RHS between the shocky towers and mounted the coils off this .
Trevor
Hopefully that should point you in the right direction, and there is ALOT of other info around (have a look through members rides threads too). Also bear in mind the above info is at least 5 years old.I have just passed this problem with my rwd 3s conversion
i used -
st185 engine
2s bellhousing from a sa63
w58 supra box
original clutch and flywheel bolted up with no hassle, just added a spigot bearing
i did have to make a small spacer for the starter motor as it sat too close to the flywheel, a fwd flywheel naturally sits a little closer to the block (by 2mm or so)
Hen
I need a working 4AGE bottom end. Pref smallport GZE, but all others considered. Also complete motors.
Drift Volvo. Was fun. 2JZ next time.
I think this might be of help...
http://www.billzilla.org/AE863SGE.htm
Also checkout my RA23 in my signature. I'm just finishing a beams conversion into that. It's similar (i'm using KE70 crossmember/rack) however I think I have a bit more room to play with than in an AE86.
1976 RA23 Celica - 3SGE Blacktop Beams Powered!
1994 KZN130 Surf - Daily 3ltr Turbo Diesel Goodness!
Yep, I was just about to post that.Originally Posted by Major Clod
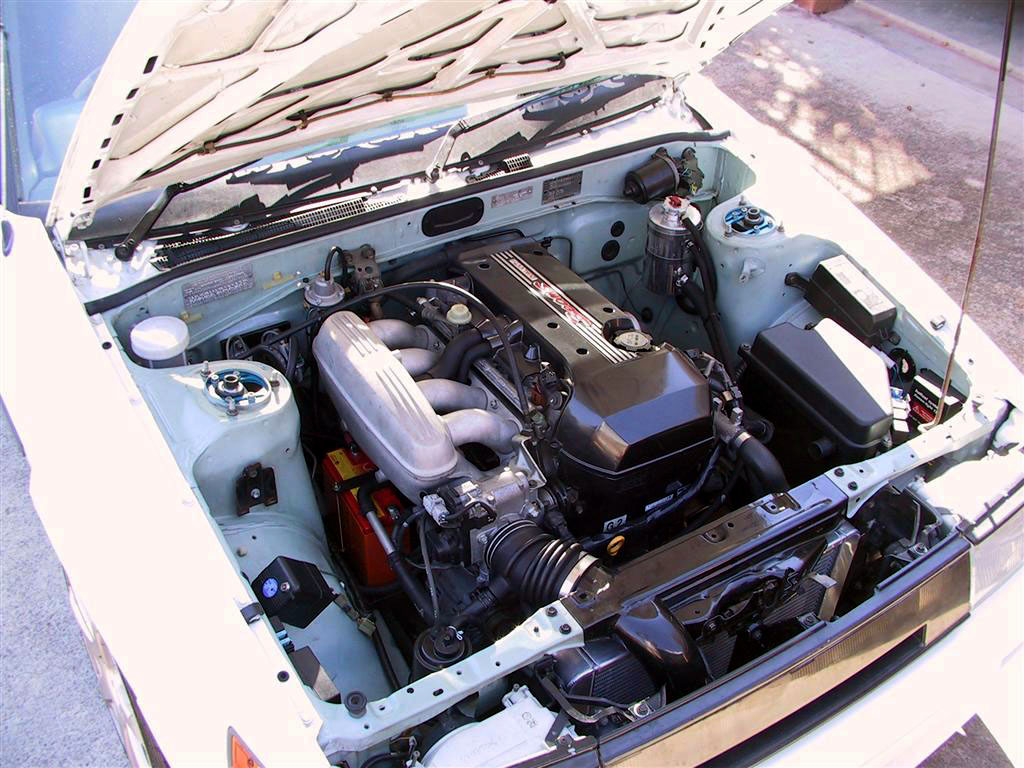
My AE-86 has had an Altezza engine & automatic gearbox since 2003.
It's quite a squeeze, if I were to do it again I'd be putting in a 7A instead.
www.billzilla.org
Toymods founding member #3
thanks heaps guys.
Billzilla, i read your thread the other day, looks olike a very tough build.
you wouldn't have any drawings or plans for how you did the sump or was that all by eye.
would be very interested to have a chat to you in regards to this.
cheers
dave
It's a stock sump, just with a few edges filed off I think - too many years ago when it was done.
www.billzilla.org
Toymods founding member #3
Oh, and most importantly, don't let anyone tell you that the speedo is driven off the front-left wheel. Pretty much everyone I asked told me that, and it's wrong.
The speedo is driven from a signal from the ECU, which gets a signal from the speed sensor which lives in the gearbox.
Have a poke around here to find out more ->
http://www.toyodiy.com/parts/
www.billzilla.org
Toymods founding member #3
Thats correct, you can get adapters in which you can put into your T50 speedo drive or W57 etc, which with out the ECU goes into limp and will not work.
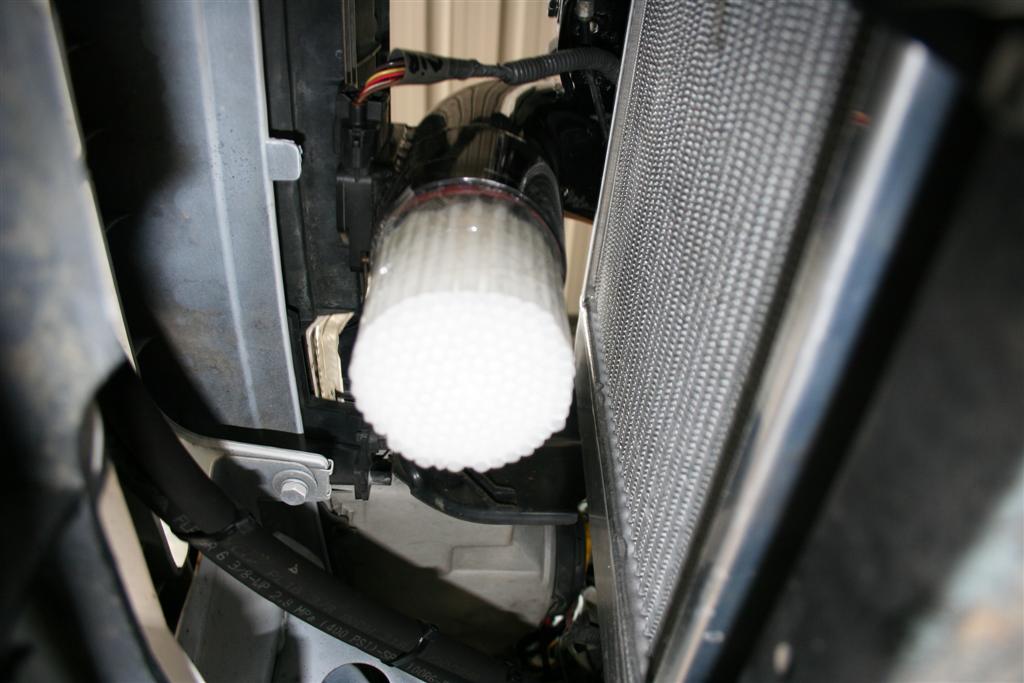
Another problem is the mounting of your air flow meter sensor as you will need the original housing that the sensor sits in as it has been shaped to direct air flow, if you just put it in any piece of pipe you get bad readings and it will run very lean. The housing is actually mounted in the original airbox which I know is not easy to fit in AE86's etc.
In which my friend cut and shut the airbox and spent some time playing around with fitment.
Hope that helps,
Cheers
Max,
4AGTE TA22
Mine works fine without the speedo drive, FWIW.
I too had that problem and solved it with cheaply.
I bunched some drinking straws together and stuck them up the inlet, in front of the airflow sensor, to straighten the airflow. Drove like crap before, drives smoothly now.
www.billzilla.org
Toymods founding member #3
Wow...
That is crazy straws... haha
so that has a filter on it after this or something?
So you have no speedo input into the ECU, I was told that you have to have it.
Shows not believe everything you hear.
Max,
4AGTE TA22
No it's got a pod filter before it ...
www.billzilla.org
Toymods founding member #3
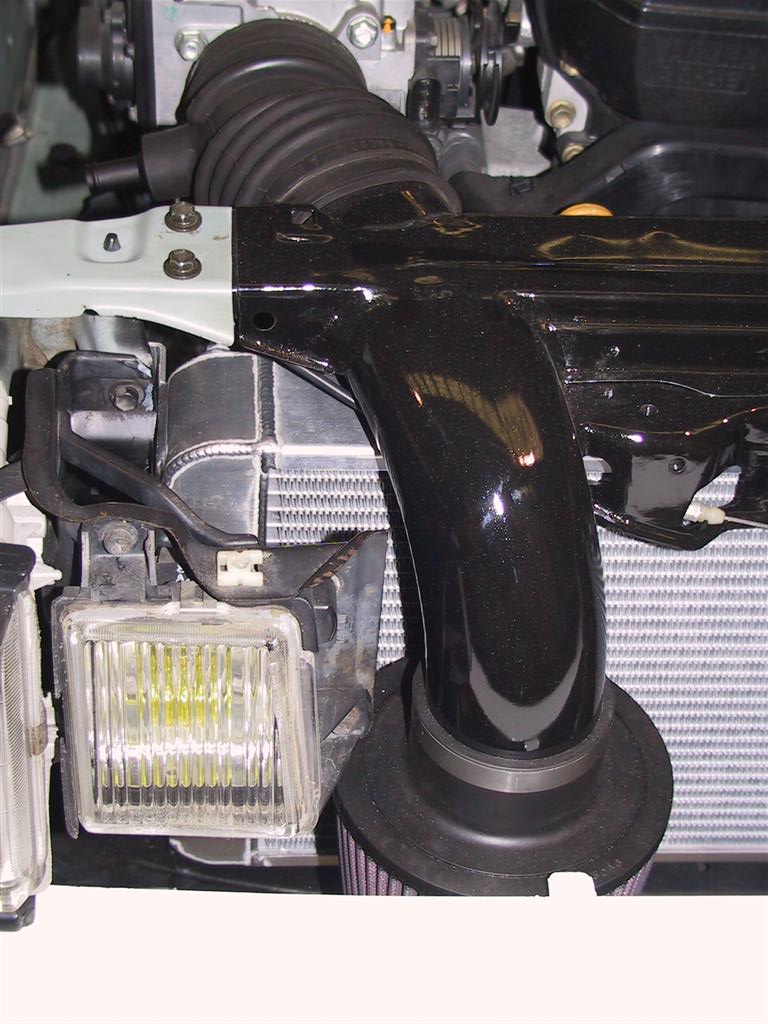
I have an Apexi Altezza Power Intake kit on mine, it's designed to copy the stock airbox airflow around the MAF sensor. No problems here.
Another misconception (for me anyway) was that you need to bypass some sort of immobiliser system that uses a coded Key. Nothing like that here on my frontcut, I think it may be something found on IS200's perhaps?
1976 RA23 Celica - 3SGE Blacktop Beams Powered!
1994 KZN130 Surf - Daily 3ltr Turbo Diesel Goodness!
 Posting Permissions
Bookmarks